This weekend the boys and I went on a new adventure in the comfort of our own kitchen. We built a gingerbread house (or in our case, barn) completely from scratch!
Each year our library has a gingerbread house contest. We had planned to participate last year, but life got in the way so this year was the year…
“Do you know how to make a gingerbread house?”
“Technically, I know how to make one…” ie. I have a pinterest board of all things gingerbread house.
Armed with an idea, a pinterest board, and a list of possible candy and food items off we went to one of the nearby Amish markets that has a wonderfully wide variety of candy items. Once we had collected any and all possibly necessary materials it was time to turn our kitchen into a work zone (aka a disaster).


Here was our plan:
Friday- shop for all items
Saturday- bake & begin assembling gingerbread barn
Sunday- finish any assembling and clean up kitchen work zone disaster
Monday- deliver gingerbread barn to the library
Well… Saturday didn’t start out as early as planned so most of the work was completed on Sunday, but it was a cold, wet, snowy, rainy, foggy, good inside day.


Furthermore, guess what I learned…
- Gingerbread building can take a really loooong time!
- They really require more perfectionism than I possess.
- There is also a lot of patience required.
- Planning ahead is rather necessary.
- They can be messy and frustrating.
- They’re a crazy amount of work (and potentially money) for something you don’t even get to eat.
Most importantly though, my kids had such a fun time and were so very proud of what they accomplished once it was finished, I learned we will probably be building another one next year.
Ok, so if you’ve made it this far in my gingerbread ramblings here’s how we built our barn. It really was a fun, family project.
I found a great gingerbread barn template here on Better Homes and Gardens website that I printed on cardstock. Based on my pinterest research I decided to cut the pieces out of my dough before baking. (This is probably where a little more perfectionism would have come in handy.) I placed rolled out my dough, placed the templates on top, and used a paring knife to cut around the templates. Then I had to try and place the dough pieces onto my cooking trays. In the future I will either cut out my pieces directly on the trays or try cooking rolled out sheets of my dough first. The pieces were difficult to move and definitely had their shapes changed slightly by the movement.


After cooking the pieces, I let them sit on the cooling racks overnight to let them dry out and harden better. Plus, I had a two year old with a fever who had just given up his pacifier and was not interested in anything other than crying and snuggling.
Sunday morning began the assembling fun. I started out by making my “cement” icing, frosting, and edible molding clay.


Once that was all ready I began by assembling the barn. I had to use soup cans to hold everything in place until the “cement” dried. Because of my lack of perfectionism when baking the pieces, they didn’t all fit together perfectly so I did have to do some shaving of sides and filling in spots with extra “cement” to keep everything together. The roof was the most difficult to fit together and felt very precarious so I ended up using pretzel rods (that we thankfully had in the cabinet) as posts inside the barn to hold them up.
“Umm… so you’re entering this in the kids category under the boys, right?”

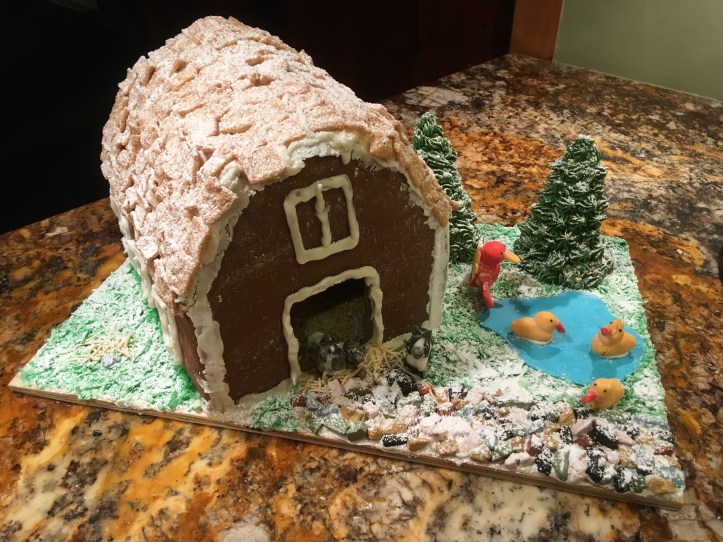
It did look rather sad at this point. Before the roof went on, I had my oldest put “straw” down inside the barn for the cows just in case someone felt like trying to look inside. My oldest used the edible molding clay to create several different barnyard animals. This was a great activity to strengthen his fine motor skills and a great lesson on patience and perseverance.


Once the barn was mostly dried & solid(ish). We put the down the grass all around the barn and the pond. Next came the stone walkway and the shingles on the roof. I piped frosting windows on the sides and a frame around the door.


My very happy oldest placed the animals he had made with the edible molding clay. He was quite proud of his animals and knew just where he wanted each one to go. The mama and baby cow sat in the doorway of the barn on a bed of straw and daddy cow stood right outside, next to the barn. One duck is outside the pond, but according to his designer, about to go into the pond. The other two ducks are in the pond facing each other so they can talk. The turkey was placed last because he wasn’t quite ready yet, but he is facing the trees so he can look at the decorations (ok, I sort of made the executive decision to slightly turn him forwards).


It’s almost completed! After some struggling to get just the right consistency and color, I piped green frosting onto a couple upside down ice cream cones for trees. We placed the trees to the back of our display, behind the pond and the boys decorated them with little white, gold, and silver candy balls (more great fine motor practice). Those balls bounce and roll everywhere!

One final step and it was finished. I sifted powdered sugar over the entire thing (and then brushed off the animals) to create the snow.
While definitely far from perfect and not necessarily going to win any prizes, it turned out beautifully, in my opinion, for our first ever gingerbread house (barn). For me much of the beauty of it is how much of the design and creation belongs solely to my boys. I love the imperfections that are due to being made by little hands with big hearts. ❤️

P.S. Driving that thing to the library was terrifying, but we made it there with the barn in one piece!
